
5 min read
Product Update, January 2024
Explore Precoro's latest features: Enhanced OCR, NetSuite updates, and the ability to send multiple questionnaires to suppliers.
Precoro presents our latest series of product updates. Please feel free to explore at your leisure or navigate directly to the updates that most interest you:
- Enhanced Supplier Registration Form functionality
- Default filters on the User Management page
- OCR improvements
- Streamlined tax integration with QuickBooks
- New user status for Slack integration
- NetSuite integration improvements
- Other updates
Enhanced Supplier Registration Form functionality
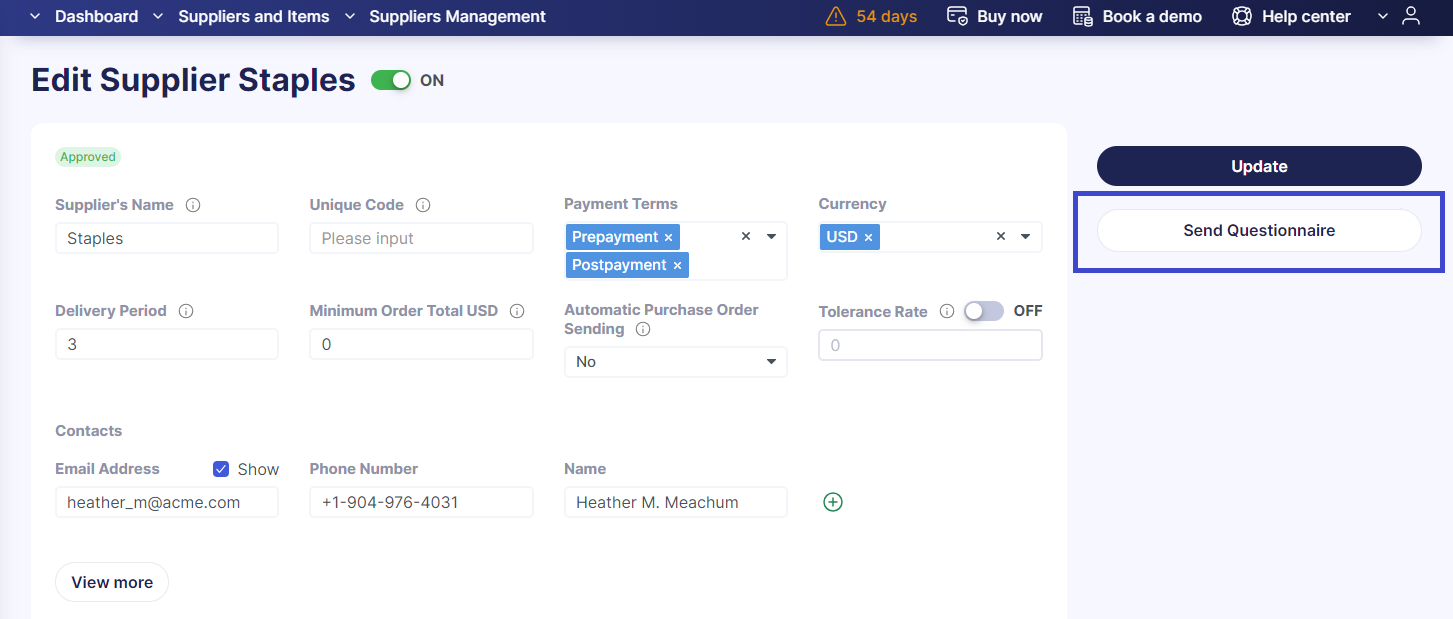
We've made it easier to update and gather more information from suppliers by allowing unlimited submissions of the Supplier Registration Form. Now, you can send as many questionnaires as you need, whether to clarify details, conduct surveys, or refresh supplier info. 💡 Please note that only one questionnaire can be sent at a time. Once it is approved, you can send the supplier the next form.
Here's how it works:
- The Send Questionnaire button will always be visible on the supplier profile, enabling you to send forms repeatedly. If a supplier is pending approval, only the current approver can send them a form. Once a supplier is approved, anyone with the Supplier Management role can send questionnaires. However, rejected suppliers won't have this option.
- After a form has been sent, it can be found listed under Sent Invitations and must be approved by the person who sent it. Plus, if your company uses a Supplier Approval Workflow, the supplier will go through reapproval after the form is approved, ensuring all information is up-to-date and accurate.
Default filters on the User Management page
We're delighted to introduce a new feature on the User Management page: the ability to save and set filters as default. Your default filter remains active even after leaving or refreshing the page. 💡 Note that you can set only one default filter on the page, but you can apply different filters as needed. When the page is reopened or refreshed, the search will revert to the chosen default filter.
To save a filter on the advanced filters panel:
- Open advanced filters;
- Select desired filtering parameters;
- Click the Save current filter button;
- Name your filter and set it as default.
To save filters on the fast filters panel:
- Select your desired parameters on the fast filters panel.
- Click the Save Filter button on the right.
- In the Saved Filters tab on the advanced filters page, you can oversee all your saved filters. Here you can also name your filter and set it as the default.
Additionally, the User Profile now includes a Search feature on the Locations and Documents Custom Fields tabs, making it easier to find information. Just click the search icon and type the Name or Code to search across all available companies.
OCR improvements
In our ongoing efforts to enhance our OCR functionality, we are pleased to introduce several important updates:
- Automatic supplier name entry in the AP Inbox: When adding a new supplier, the system will now auto-populate the Supplier Name field with the information recognized by OCR.
- Improved navigation and sorting: Easily locate the Identified Supplier option in both the quick filter panel and advanced filters on the AP Inbox page.
- Enhanced document creation: To increase the amount of invoices that can be automatically generated from purchase orders, we've implemented additional matching rules for OCR processing. 📖 Read about them in this article on Precoro’s Knowledge Base.
- New status for OCR files: We've also introduced the new Paid Limit Exceeded status for OCR files in the AP Inbox. This status indicates that you have exceeded your paid document processing limit. To continue processing documents, simply navigate to the Billing page to replenish your account balance.
Enhanced process for integrating taxes with QuickBooks Online
We're excited to announce an upgraded tax integration process between QuickBooks and Precoro, making it more seamless than ever to manage your taxes. Now, you can effortlessly import and update taxes directly from the Configuration page.
To import taxes from QuickBooks:
- On the Configuration page, proceed to Step 5 and click the Import Taxes button.
- Select which tax rates to apply by checking the corresponding boxes.
- Scroll to the bottom of the page and click the Import button.
- You will receive a system notification confirming the success of your import.
To synchronize taxes, simply click the dedicated button on the Configuration page. A system notification will display how many tax selections were successfully synchronized.
💡 It's important to note that if Precoro finds an identical tax (same name and same rate) in both systems, it will automatically match them.
New user status for Slack integration
If you map users with Slack that aren't found in your workspace, they'll be marked as Not Integrated. If you later add these users to your Slack workspace, they will automatically be remapped during the next user mapping process.
NetSuite integration improvements
Removed the default value from the Documents to Send field
Previously, the Approved PO option was selected by default in the Documents to Send field within NetSuite integration settings. To prevent any potential issues, we've removed this default selection, so that it’s required to fill out the field. Now, when setting up the integration for the first time or modifying an existing setup, you'll need to explicitly choose the appropriate option for the Documents to Send field.
Automatic mapping of new users
Now, our NetSuite integration automatically maps new users in any company already connected to NetSuite. If you add a new user or an existing user accesses a new company, and that company has users previously mapped with NetSuite, the new user will be auto-mapped.
Simplified view of unsent credit notes to NetSuite
You can now easily spot unsent credit notes marked as Paid and invoices labeled as Not Paid, all in one place. They can be found on the Not Sent to NetSuite info card located on the Invoice management page.
Automatic resend for unsuccessful NetSuite line requests
When a document is successfully sent to NetSuite but its lines fail to record—regardless of whether an error appears in the logs—we'll automatically attempt to resend it after 15 seconds. If the lines fail to record on this attempt, we will retry every 15 seconds, up to a maximum of 10 attempts. You'll be notified via a log entry when the update is successful.
Improved Receipt Date Sync with NetSuite
We've updated our NetSuite integration to address timing issues. Previously, document receipt dates weren't transferred, causing mismatches if posting periods had closed already. Now, we send the Receipt Date directly to NetSuite's Trandate field, allowing you to set the document date accurately for open posting periods, and helping you avoid any date or period errors.
Other updates
New reminder about users without DCF access
To further assist in managing access to custom fields for documents (DCF), after introducing an info card for users lacking the necessary DCF access, we've now implemented weekly email reminders about them. These reminders will be sent to Configurators every Monday, but only if there are users within their company who do not have the required DCF access.
New status filters in the Attachments Export
We've enhanced the attachment export process by introducing multi-select status filters, making it faster and easier to find exactly what you need. Now you can filter attachments by document status, supplier status, payment status, receipt status, and transferred status.
To use the new filters:
- Navigate to the Export Attachments page and click on Create Request.
- Fill out the required information.
- Use the new status fields to refine your search and export only the attachments you need.
Standardized opening of documents
Starting from this update, whether you're clicking on a document line, a preview button, or a related document number, it will open in the same tab. If you prefer to open the document in a new tab, simply press and hold the command or control button on your keyboard and then click on the document.
Enhanced notifications for mass document approval actions
We've upgraded the notification system for the mass approval actions. Now, when you use this feature, you'll receive a single notification. This notification will include all the essential details about the action, prominently displaying the total number of documents approved along with key information about them.


