
4 min read
Product Update, March 2024
Discover the latest updates to Precoro: upload custom supplier fields, skip unnecessary approval steps, and limit document visibility.
Precoro presents our latest series of product updates. Please feel free to explore at your leisure or navigate directly to the updates that most interest you:
- New Custom Fields for Suppliers
- Streamlined approval processes for invoices and purchase orders
- The ability to select the Supplier Custom Form within documents
- The option to restrict document visibility
- New OCR capabilities
- Improved bulk deletion for the catalog items
- Streamlined custom document creation
New Custom Fields for Suppliers
Managing supplier information in Precoro just got a lot easier. You can now upload and update custom fields for suppliers (SCFs) right from the Supplier Management page. Depending on your setup preferences, you can link SCFs to your suppliers using their name or a code. Just ensure the names or codes exactly match those in Precoro. If they don't, you'll get a prompt to correct them.
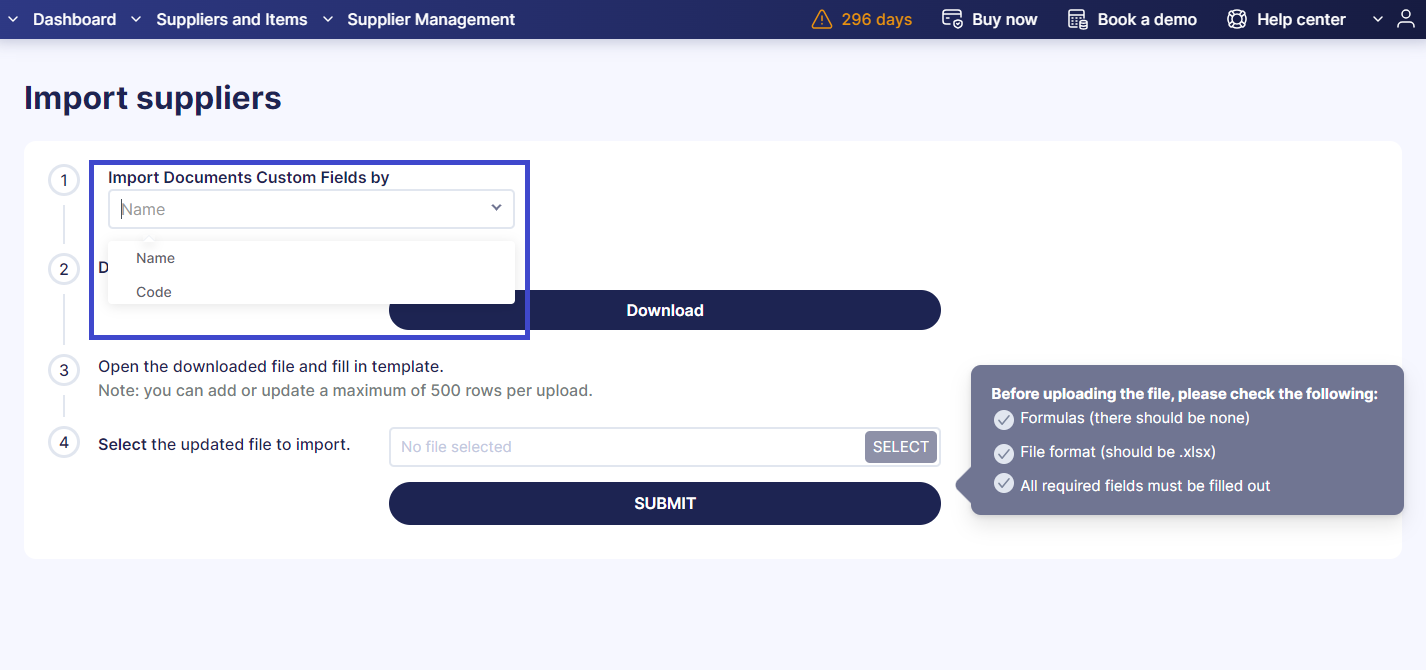
Custom fields for suppliers can be of three types — Multi-select, Text, and Date — to cater to different data requirements. Here is how they work:
- Multi-select: Assign multiple selections within a single field using a semicolon (;) as a delimiter.
- Text: Directly input text values.
- Date: Enter dates, ensuring they adhere to the format specified in Basic Settings. It's essential to set the Excel column format to text for date fields to ensure accurate documents are imported and updated accurately.
Streamlined approval processes for invoices and purchase orders
Ensure your financial operations proceed without unnecessary delays by eliminating redundant steps for approval workflows. Specifically, you can now remove approval requirements for invoices generated from POs and POs generated from PRs when related documents have already been approved.
To enable these features, navigate to the Basic Settings → Approval tab and mark either the Exclude Invoice from PO from Approval, or Exclude PO from Purchase Requisitions from Approval checkbox, or both if needed. Don't forget to click Save to apply the changes.
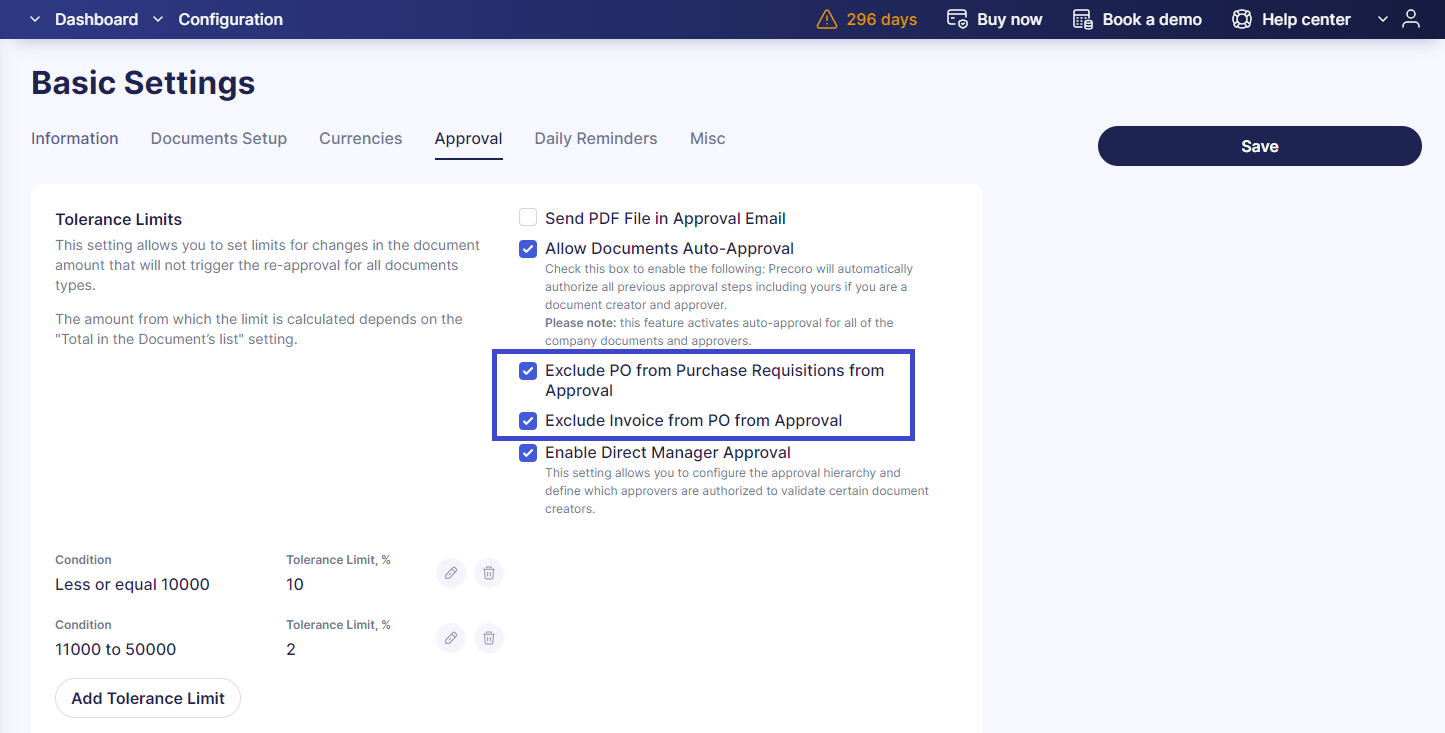
Here is how these features work:
- Exclude Invoice from PO from Approval: This setting allows invoices generated from POs to bypass the usual approval process, automatically marking them as approved once confirmed. It's important to note that while this setting facilitates quicker processing for standard invoices, invoices originating from Blanket Purchase Orders and the Supplier Portal will still require approval.
- Exclude PO from Purchase Requisitions from Approval: When activated, this feature ensures POs that exactly match the associated PRs are approved automatically, without the need for further review. The system will automatically check for any discrepancies in the net total or the item count between the PO and PR. Should there be an increase in either, or if a new item is added, a re-approval process will be initiated.
📖 To learn more about this update, please refer to our latest article on Precoro’s Knowledge Base.
The ability to select the Supplier Custom Form within documents
You can now select the Supplier Custom Form when requesting a new supplier in the documents.
Simply follow the steps outlined below:
- Go to the Custom Form Settings and click the New Custom Form button.
- Enter a name for your form and choose Supplier from the Form Type dropdown menu.
- Tailor the form to fit your needs and click the Create button, located in the top right corner.
- When creating a document—be it a PO, PR, or invoice—navigate to the Supplier field and click Add New Supplier.
- Choose the appropriate form for your needs and click the Next button to proceed.
- Complete all necessary fields in the selected form and submit your new supplier request by pressing the Request button.
💡 Please note that the option to select a specific type of Supplier Request will only appear if you’ve previously created a Supplier Custom Form.
The option to restrict document visibility
In our latest update, we're introducing a feature that allows users to view and interact with only the documents they've created. To enable this feature, go to Configurations → Basic Settings → Document Setup → General Settings, and mark the View Only Self-Created Documents checkbox. By default, this feature is turned off. Turning it on limits users so that they can only see the documents they initiated.
💡 It's important to note that users in approval roles will maintain visibility over all documents that require their approval.
New OCR capabilities
We've updated our OCR technology to make document auto-creation smarter and more flexible with two new invoice-to-PO mapping rules:
- Selective Mapping: This option allows documents to be processed if they match at least one of the specified rules.
- Complete Mapping: For stricter control, this setting requires documents to fully meet all established rules without any exceptions.
💡 It's important to note that these mapping rules are accessible only when you've selected PO-based invoices under the Invoice Type for Auto Creation. To enable these new OCR features, please reach out to our Support Team for assistance with setup and configurations.
Additional OCR updates:
- Resizable split screen: To further tailor the OCR experience to your needs, we've introduced the ability to resize the split screen view when working with attachments.
- Custom fields display on credit notes: When creating credit notes via OCR, the system now displays custom fields for items from the related invoice.
Improved bulk deletion for the catalog items
We've refined the bulk deletion process for items in the Precoro Catalog. Now it's straightforward to identify which items are eligible for deletion and which are not.
Items that are currently in use within documents or are part of integrations are marked with unclickable checkboxes and bin icons. This ensures they won't be accidentally selected during a bulk deletion operation.
Following a successful bulk deletion, a single notification will inform you of the total number of items removed.
Streamlined Custom Document Creation
Creating custom documents has just gotten easier on the document management page. Now, whether you're aiming to create a Standard or Custom document, simply click the Create button and choose the appropriate option from the drop-down menu.
💡 Please note that the drop-down menu with document options will only appear for users who are utilizing the Document Custom Forms functionality and have previously set up forms for specific document types.


