
5 min read
Product Update, April 2024
Explore the meaningful features Precoro prepared this April: updates to approvals, currency change for approved POs, OCR improvements, and more.
Precoro presents our latest series of product updates. Please feel free to explore at your leisure or navigate directly to the updates that most interest you:
- The option to add an approval step for overbudget expenses
- The ability to change the currency for approved POs
- The option for suppliers to update their custom fields
- Expenses can now be integrated with QuickBooks
- OCR functionality improvements
- Simplified access to new custom fields for documents
- Customizable access for creating PRs from WR documents
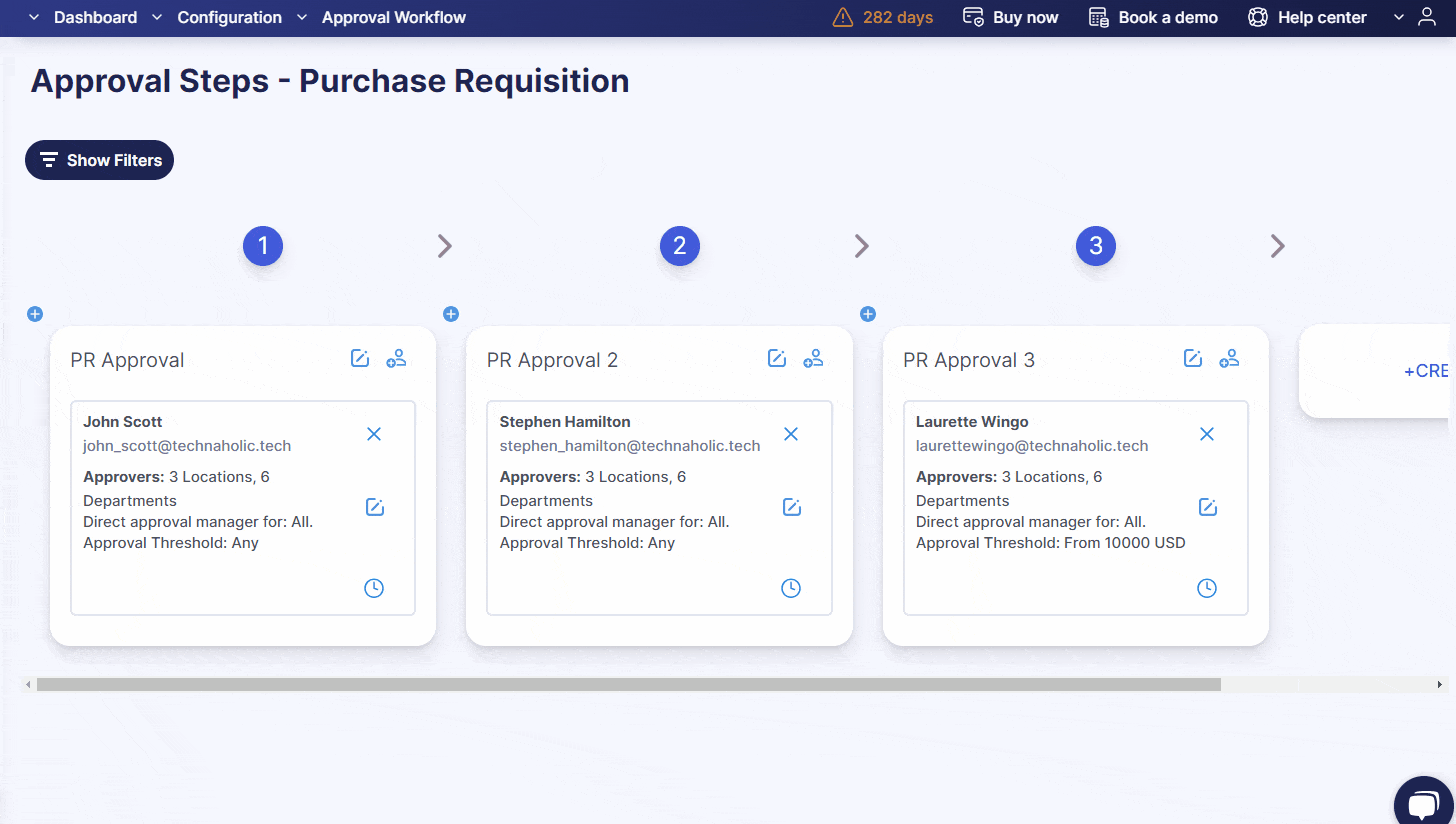
The option to add an approval step for overbudget expenses
To address the challenge of unregulated budget spending, which can lead to budget overruns, we have introduced a new feature that allows for the configuration of an additional approval step for expenses that exceed the budget. It is available for the Purchase Requisition, Purchase Order, Invoice, and Expense document approvals.
How to activate the overbudget approval feature:
- Navigate to the Basic Settings → Approval tab.
- Check the Overbudget Approval option.
Once activated, head over to the document approval workflow page. Here, either create a new approval step or update an existing one by checking the Overbudget Approval box. The step will become active only for transactions that exceed the budget. Such documents will go through all standard approval steps plus the overbudget review.
The ability to change the currency for approved POs
Changing the currency in your purchase orders can make your financial operations more flexible and accurate. For instance, you may need to change the currency due to errors in the original selection or because switching suppliers necessitates a different currency.
Starting with this update, you can update the currency directly in the existing document even if it was approved.
We're dedicated to making this process even smoother. Soon, you'll also be able to change currencies in invoices.
📖 To learn more about this update, please refer to this article in our Knowledge Base.
The option for suppliers to update their custom fields
We're excited to introduce a new feature that allows suppliers to directly update their custom fields in our Supplier Portal.
Here’s how to set it up:
- Navigate to the Suppliers and Items section.
- Click on Supplier Custom Fields.
- Edit an existing field or create a new one.
- Enable the Display in Supplier Portal option.
- Save your changes.
💡 Please note that this feature is only available if the Supplier Portal is activated for your company.
Now both you and your suppliers can easily edit these custom fields whenever needed, ensuring that everyone has the latest information. Any changes made by suppliers are reflected in their profiles instantly, and any updates you make will appear in the portal for them to see.
Expenses can now be integrated with QuickBooks
We've made it easier to manage your finances by adding the ability to integrate approved expenses directly into QuickBooks. This feature automates the transfer of expense data, eliminating the need for manual data entry and ensuring your financial records are always current and accurate. Here’s how to set it up:
- Go to the Integrations page → STEP 6: Integration Options. Here, mark the Send Approved Expense checkbox.
- Import payment accounts and payment methods from your QuickBooks account.
Once configured, approved expense documents will automatically be transmitted to QuickBooks. Within QuickBooks, these integrated documents can be found in the Expenses module under the transaction type Expenses.
OCR functionality improvements
Enhanced split screen and document clarity
We've upgraded our split-screen feature, allowing you to adjust the screen layout after you've created a document from the AP Inbox. This is applicable to both invoice and credit note types. The quality of uploaded files has also been improved to maintain their original resolution and contrast. Furthermore, you can now easily select and copy text directly from these files.
Simplified tax entry and automated rate detection
We've simplified the process of managing taxes. Now you can add taxes directly within the document — no need to navigate away to settings. This way you can save valuable time when processing documents in your AP Inbox.
Here's how to add a new tax through the document:
- Click on the Taxes field and select the Add New Tax button from the top of the dropdown menu.
- Enter the required tax information and click the Save button. The new tax will now appear in the dropdown list for selection.
We've also improved our OCR capabilities to automatically populate the Tax Rate field. The system identifies tax values from documents and matches them with your existing rates, automatically recording this information to speed up processing and reduce errors.
📖 For detailed guidance on creating taxes, refer to this article on our Knowledge Base.
New notification for unprocessed documents
We've introduced a new notification feature under Email Preferences → Misc → Notification with the List of OCR Unprocessed Documents. Users assigned OCR roles can now receive weekly emails detailing all documents that have not been processed by OCR in Precoro.
To ensure your documents are processed smoothly, please check the following:
- Verify that the document type is an invoice.
- Confirm that the document format is PDF, JPEG, PNG, or TIFF.
- Ensure the document is not password-protected or encrypted.
Supplier name auto-fill when creating requests
When you request a new supplier, the supplier name will now be automatically populated with the value recognized by OCR. This auto-fill feature is available on the following pages:
- AP Inbox page
- Invoice creation page
- Invoice from PO creation page
Simplified access to new custom fields for documents
To ensure that all employees can use new custom fields for documents (DCF) right away, we're automating access assignments. Now whenever a new DCF is created, every company user automatically gets access to it and any options that get added later. Administrators can adjust who gets access by removing unnecessary options for specific users through the User Management panel.
💡 Please note that if a user's access has already been manually edited and they do not have the Access to All option enabled for this DCF, they will not automatically receive access to new permissions associated with this DCF.
Customizable access for creating PR from WR documents
We've introduced a new feature that lets you customize access for creating PRs from Warehouse Requests (WR). To use this feature, simply navigate to Configuration > Basic Settings > Documents Setup > Purchase Requisitions and check the Enable creation of PR from WR option.
💡 Please note, this option will only be available if the Warehouse Requests module is active in your company.
When this feature is not enabled, the PR from the Warehouse Requests button will not appear on the Purchase Requisition management page, and there will be no info card for this document type on the dashboard.


